|
Part 4
Soundproofing Your Home Studio: Room Echo - Reverb & Ambience
By William Williams Voice Actor & Coach Aliso Creek Productions In Part 3 of this series we tamed that noisy computer. Now we’ll need to look at the final piece of the puzzle: room echo.
Echo, Ambience and Reverberation. For the audio purists I'll define each of these terms:
Echo: a clear repeat of sound. The famous "HELLOOO ... helloooo" that you'd hear in Echo Canyon. A real quick echo is called a delay (Elvis in the stairwell).
Reverberation: a mix of hundreds of little echoes combined into one smooth decaying sound that lasts longer than the original sound. You hear reverberation on the vocals of recordings. Think of the sound in a cathedral or a parking garage.
Ambience: the unique combination of delay and reverberation that is specific to a particular space.
For instance, your living room may have a certain ambient sound while your bathroom might have another.
You'll hear different "ambiences" used in movies to simulate the sound of the rooms the scenes are set in. Film recorders will often record "room tone" - the not-quite-silence that all rooms have - so that they can simulate the room ambience later.
BIGGEST COMPLAINT: AMBIENCE
The big complaint I get from clients concerning home recordings is room ambience in the recording.
Room ambience is a fancy audio term for that room echo that most rooms have - think empty house or apartment or your bathroom. Clients don't want that sound.
ONCE IT'S IN A RECORDING, IT CAN'T BE REMOVED!
Clients want a dry recording. That means just your voice and no echo.
CAN'T EDIT AMBIENCE
Also, you can't just edit the silences between phrases to eliminate this echo because it also "colors" the sound of your recorded voice.
So listen very carefully (with headphones!) to your recording and listen for this "room echo".
If it's there you must "deaden" the room to eliminate it.
YOUR VOICE BOUNCES
Where does this echo come from?
Well, your bedroom office might not sound like your bathroom, but the sound of your voice still bounces off the plaster walls and ceiling.
So the mic hears your voice directly and these series of tiny echos from your walls.
HOW TO TAME ECHO
When sound travels from one medium to another - for example when the sound in the air hits your plaster wall - it can do one of three things. It can be:
For example, walls in houses tend to reflect high frequencies and transmit low frequencies.
So in a room with little furniture you'll hear a bright echo when you talk, as the high frequency sound reflects around the room.
And if you turn your stereo up loud and go outside you'll hear a "muffled" version of the low frequency sound transmitting through the walls.
So the secret to taming echoes is absorb, absorb, absorb.
TO ABSORB SOUND
What absorbs sound? Upholstered furniture, beds, heavy drapes, throw rugs, carpeted floors, a Norman tapestry from the 12th century ... you get the idea.
So start with rugs on the floor and soft furniture and drapes.
Here's another aspect of the problem. Most people set up their studio on a wooden desk in the corner, facing the wall. So the energy from their voices bounces off the desk, bounces off the walls to the side, and bounces off the ceiling above.
BLOCK WITH FOAM
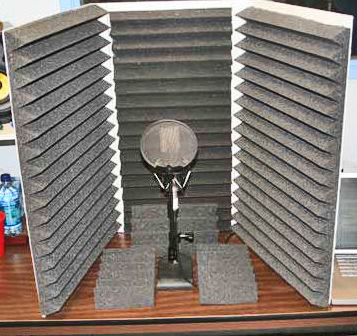
 This is where a three-sided acoustic foam booth (pictured) comes in handy - and you might want to put a lid with foam on it, as well. This is where a three-sided acoustic foam booth (pictured) comes in handy - and you might want to put a lid with foam on it, as well. It can be built inexpensively with acoustic foam attached to foam core panels with spray adhesive.
This actually serves two functions:
So try that.
TREAT WALLS, TOO
You can also treat the walls and ceiling around your space with acoustic foam.
If you don't want to glue it directly to the wall, then glue it to foam core panels and hang them on the wall like pictures.
TO SUM UP ...
So there you have it. To achieve a quality recording environment you need to:
You can test how dead the room is by clapping your hands sharply once and listening for any echo or reverb.
Soundproof against outside sounds and sound control the inside ones.
Put the effort into this, and your recordings will sound top notch and professional and “broadcast quality.”
Remember: keep talking!
ABOUT WILLIAM ...
William Williams is a voice over talent with national, regional and local credits. He has also been a voice over coach in Los Angeles for 15 years where he teaches regular classes, does private coaching, and produces voice over demos at Aliso Creek Productions, in Burbank. He also offers online voice-over classes and coaching.
Email: new_leads@alisocreek.net
Online voice-over classes: http://onlinevoiceoverclasses.com/
... Low Prices ... Speedy Delivery!
|
Tell Us What YOU Think!
Please Note: Since we check for spam, there will be a slight delay in the actual posting of your comment.
Comments
No comments have been posted yet. Hurry, and you could be the first!


click for new article alerts