


|
Mic Techniques: How To Use
The Mic To Sound Your Best
By Dan Friedman
Audio Engineer, Producer & Voice Talent
The ability to use proper microphone technique to bring out the best in your voice is indicative of a true voice over professional.
Learning and using proper microphone technique is incredibly helpful when it comes to editing, mixing and producing great voice overs.
For instance, knowing how to avoid plosives, adjust for dynamics, and "work" the microphone so that it will enhance the emotion of the delivery, are essential skills.
Expertly applying these skills helps a recorded voice track fit into a mix almost effortlessly.
GENERAL MIC POSITIONING
Your proximity to the microphone - how near or far you are to it - affects the microphone's frequency response.
Your axis to the microphone – how centered or off-center you are to the diaphragm – affects frequency response, as well as how well the microphone captures your voice depending on its polar pattern.
Naturally, the dynamics of your delivery affect the microphone, as well.
DEFINING TERMS
The term frequency response refers to the lows and highs in the tone of your voice (like bass and treble on a stereo).
Polar pattern refers to the space around the microphone's diaphragm that picks up sound.
A microphone for voice over typically (although some are adjustable) utilizes a cardioid polar pattern. Imagine a space the size and shape of a large pumpkin around the grill of the microphone: this is a cardioid pattern.
Dynamics refers to how loud or soft your voice gets while reading a script.
THE 'SWEET SPOT'
 Each microphone, no matter what type you are using, has a sweet spot. Each microphone, no matter what type you are using, has a sweet spot. This is the place in proximity to the sound source where the microphone generally sounds its best.
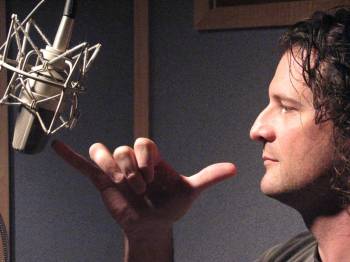
In large diaphragm condenser microphones, the sweet spot is generally about 6 to 8 inches away from the diaphragm (see photo).
This is often where your voice will sound its most natural, relative to the ability of the microphone to reproduce that sound accurately.
POSITION YOURSELF
 When using a large diaphragm condenser, position yourself about 6 to 8 inches away from the microphone, with the diaphragm slightly off center - left or right, whichever feels comfortable (left photo) and above your mouth (below). When using a large diaphragm condenser, position yourself about 6 to 8 inches away from the microphone, with the diaphragm slightly off center - left or right, whichever feels comfortable (left photo) and above your mouth (below). 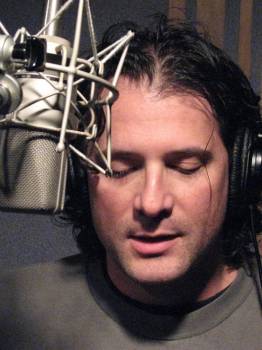 If your voice sounds too "nasally," try moving the microphone lower or higher. If your voice sounds too "nasally," try moving the microphone lower or higher. TRY A TILT
Tilt the microphone slightly backwards, so that the air coming from the mouth and nose doesn't hit the microphone's diaphragm directly, but at an angle.
Tilting the angle of the microphone helps to diffuse the impact of the air, which helps to avoid plosives.
This initial position will work for more common voice overs, such as straight-forward announcer, narration, and promotional reads.
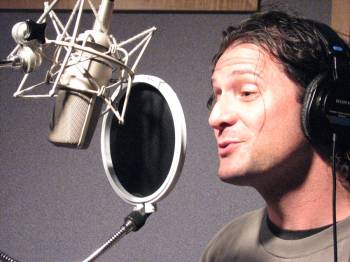
GET CLOSER
For more creative script scenarios, treat the microphone as you would someone's ear.
For a voice over that is intimate, don't be afraid to move in closer.
Getting closer to the microphone will enhance the lower and higher frequencies of your voice, which is perfect for whispery, breathy, romantic or seductive reads.
TURN TO SHOUT
For reads that require projection, such as a shouting car spot or a voice over where you are supposed to sound as though you are calling out from another room, it is best to turn away or to increase the distance between you and the microphone.
In this type of scenario, creating physical distance during recording makes the scene sound more natural when mixing.
In some situations, you can even move to the back side of the microphone.
WHAT ARE PLOSIVES?
One basic but very important element to good microphone technique is being able to restrain plosives.
Hard consonants such as "t" and "p" can cause the diaphragm of the microphone to "pop."
At worst, this pop can potentially damage the microphone, and at best it is a guarantee that another take will have to be done.
Plosives can also occur at the ends of words where a consonant requires an expulsion of air such as with "f".
AVOIDING POPS
Tilting the microphone backwards, as previously described, can help avoid plosives.
But there are several other techniques and tools for avoiding plosives such as:
SOCK CAUTION
Be aware that when using a wind sock - a foam cover that goes over the head of the microphone - the sound of the microphone can be somewhat altered.
High frequency response and sibilance is often diminished, and therefore proper technique in combination with a pop filter is a much better solution.
PRACTICE, PRACTICE
Good technique takes practice.
Record yourself reading various types of copy from various distances in proximity to your microphone.
By doing this, you will learn how your microphone is affecting your voice under various condition, and how it improves, or impairs, your ability to communicate the intended feeling that goes with the message.
ABOUT DAN ...
Dan Friedman is a voice talent who began as an audio engineer in 1994, working with live sound and then in radio and recording studios. He has been a producer with ProComm Voices for nearly 10 years, and since 2005, a voice talent with a growing list of of clients including radio and television campaigns. He recently published the comprehensive book, Sound Advice - Voiceover From An Audio Engineer's Perspective. The book provides an excellent foundation for understanding voiceover audio and equipment. "I'm passionate about what I do," says Dan. "This is a great business."
Email: danfriedmanvo@hotmail.com
Sound Advice book: Click Here
Your Daily Resource For Voice-Over Success
|
|
|
 Note: The author recently published an excellent guide to voice over audio and equipment,


.png)


.gif)
Get your bi-weekly dose here ... all things VO!
For essential voice-over business strategies
With Sean Daeley and Paul Stefano - check it out!
Email alerts to new VoiceOverXtra articles
As of the NEW website launch, 03/22/2012
Thank you for putting together this collection of useful tips. :)
Tom
Headphones are a personal choice. I consider them absolutely necessary for my voice work but also because using headphones allows me to hear direction and instructions from clients, directors, engineers, etc. Since my sessions are always live with others involved, this makes the most sense for me.
Also, headphones are better than speakers because of the risk of feedback or audio bleeding from the speakers into the microphone.
Thanks for your question. Please feel free to post to my website as well. www.soundadvicevo.com
One additional thing to note, however, is that the mic doesn't care where it is - as long as the source of the sound is on-axis of the diaphragm. Speaking as a 35+ year audio engineer/producer (and author of "The Art of Voice Acting"), one of the most common mistakes I've seen is that performers think they must speak directly into the front of the mic and use a pop filter. This is a myth!
As long as you are in the mic's sweet spot and you are on-axis of the mic's diaphragm, your voice will be heard exactly the same if the mic is the same distance in any direction from your mouth: directly in front (susceptible to popping), off to the side, above your eyes, or below your chin. Sound exits your mouth omnidirectionally at the same volume. As long as the mic is within your peripheral vision (not more than about 80 degrees off to the side of your mouth) and the diaphragm is aimed directly at your mouth, your voice will sound the same.
Proper placement slightly above eye-level or off to the side can eliminate the need for a wind screen to kill popping and breath noise. One thing to remember, though, is that whatever other sources of sound (or noise) that the mic might be pointed towards on the other side of your body will also be picked up.
Stephanie from Voices.com has been asking this week about de-breathing material after recording, so I thought it worth mentioning here too. Basically, remember that if you have a tendency to get too close and "eat" the mic, your breathing will be that much louder, too - which might make more work for you in the edit if you do choose to take those breaths out!
Howard Ellison, Devon UK.
Thanks,
Debbie